3. Build your own Sphinx documentation
In this section you will:
create a brand new documentation set using rST/Sphinx
turn it into a Git repository
publish it on Read The Docs
explore some more advanced Sphinx features
You’ll need to:
be comfortable using the commandline
be familiar with the basics of Git
have Python 3 on your machine
Did you skip parts 1 and 2?
If so, before you continue, please add your name to the register as described in part 2, by making a pull request or using the GitHub interface.
Install Sphinx
Create and activate a virtual environment for Sphinx, for example:
python3 -m venv sphinxenv
source sphinxenv/bin/activate
(or however you prefer to do it).
Then install Sphinx:
pip install sphinx
Create the documentation set
In a new directory, run:
sphinx-quickstart
You’ll be asked some questions; accept the defaults where they’re offered, but provide them where required (the project name and your name).
Build the documentation
Just to prove that it has all worked:
make html
And if you accepted the defaults earlier:
open _build/html/index.html
to open it in your browser.
Add your own content
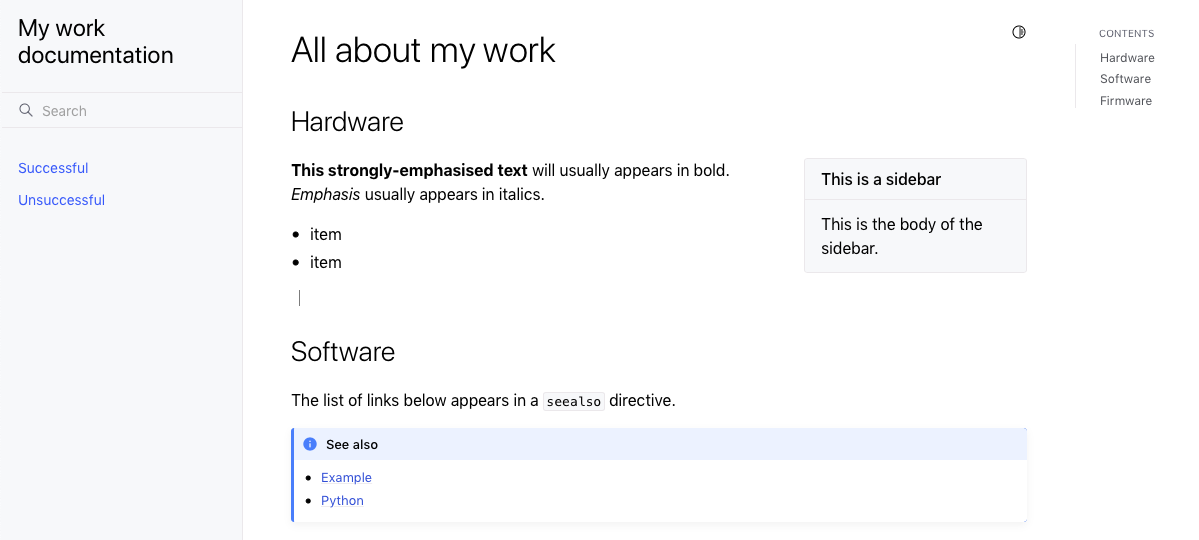
The index.rst file is the default home page of the documentation. Replace
the entire contents of that file with something of your own, for example:
=================
All about my work
=================

Some basic formatting
=====================

.. sidebar:: This is a sidebar

    This is the body of the sidebar.

*Emphasis* usually appears in italics. **This strongly-emphasised text** will usually appear
in bold.

* item
* item


Some links
==========

The list of links below appears in a ``seealso`` directive.

.. seealso::

    * `Example <https://example.com>`_
    * `Python <https://python.org>`_


Code
====

Sphinx has a number of parsers for automated language highlighting in
code-blocks. It does a good job of guessing what language you're using,
but you can also state that explicitly as in this example:

 .. code-block:: bash
    :emphasize-lines: 2-3

    python3 -m venv sphinxenv
    source sphinxenv/bin/activate
    pip install sphinx
    pip freeze > requirements.txt
    sphinx-quickstart
And then rebuild with make html, checking that there are no errors, and
that the HTML output is what you expected.
Add more pages
Add a couple of new pages alongside the index.rst, with titles and content
of their own. For example, add:
successful-projects.rst
unsuccessful-projects.rst
Add a table of contents
In order for Sphinx to make the new pages available, it has to know what to do
with them. The way to do this is to add a table of contents directive to
index.rst:
.. toctree::
   :maxdepth: 1

   successful-projects
   unsuccessful-projects
The table of contents will appear wherever you put it in the home page - and also in the side navigation bar.
(This is just a very basic example. More complex nested structures are also possible, and you can arrange pages in folders for convenience.)
Run make html to check your changes and the output.
Explore Sphinx links
At this point it’s worth spending a little time to discover how Sphinx handles linking. As well as the obvious linking to URLs, Sphinx provides semantic linking to objects. Given any object in the documentation, which could be a page, heading, section, table, image or even something such as a module, class or function, Sphinx will know what it is, what kind of thing it is, and where to find.
It can do this wholly independently of any URL it has, and it will work in different mediums (HTML, PDF, etc). It can even do this between the documentation of different products.
Link to a page
Add:
:doc:`Back to the home page </index>`
or even just:
:doc:`/index`
to one of the other pages to see how this works.
Link to a reference
Add a label to a heading, for example:
.. _software:

Software
========
Now you can link to this heading from anywhere else in the documentation:
:ref:`software`
The link will always work; you won’t need to update it because you changed the text of the heading.
Custom link text
As you may have noticed in the examples given above, a link to a page or a reference will automatically use the target’s name, but this can also be overridden. For example:
:ref:`All about software <software>`
will create a link to the Software heading, with the link text “All about software”. This general pattern works for all kinds of link types.
Intersphinx links
To link to content within another documentation project, Sphinx needs to know
about it. In your project’s conf.py, edit the extensions list to
include Intersphinx:
 extensions = [
     'sphinx.ext.intersphinx'
 ]
And then supply it with the details of some other documentation sets:
intersphinx_mapping = {
    'python': ('https://docs.python.org/3', None),
    'diataxis': ('https://diataxis.fr', None)
}
And try some of the following in your content:
* :ref:`diataxis:how-to`
* :mod:`python:logging`
* :meth:`the start() method of the Thread class of Python's threading module
  <python:threading.Thread.start>`
This is an immensely powerful way of working with the documentation not just for a single product, but an entire ecosystem. Once you’ve published your own documentation, it too becomes available via Intersphinx.
Apply a Sphinx theme
So far, your documentation is using the default Alabaster Sphinx theme. Try the Read the Docs theme, or Furo.
pip install sphinx-rtd-theme
Then in conf.py change the html_theme setting:
html_theme = "sphinx_rtd_theme"
pip install furo
Then in conf.py change the html_theme setting:
html_theme = "furo"